

Prior to being acquired by RAZOR (July 27, 2015), the OUYA would normally see system updates rolling out every 4 to 6 months. It's been over a year (Nov. 6, 2014) since we've seen a system update to our beloved OUYA set-top box. With no indications from OUYA or RAZOR as to when an update is coming, I've decided to take things into my own hands.
My current problem with the OUYA is that its ROM comes with a proprietary operating system based off Android 4.1 (Jellybean). While this was state of the art back in early 2013, Android 4.1 is no longer being supported by KODI developers. To me, KODI a.k.a. XBMC, is what made the OUYA such an awesome device. So I want to update my OUYA so as to continue being able to use KODI.
To solve the OUYA's outdated ROM situation I would be turning to XDA-developers, the worlds leading mobile development community, and specifically its OUYA Development branch. Now your probably thinking "Mass, the OUYA isn't a mobile device" and you're right, but the OUYA does run on the Android platform and these guys and girls who make up the XDA community are smart as f***, when it comes to Android development. After spending a considerable amount of time on the XDA forums, I finally felt confident enough to try modding my OUYA's ROM.

**WARNING** I take no responsibility for any damage you may encounter when using the following steps.
You will need to have the OUYA hooked up to an HDMI monitor/TV, a USB micro cable, and a USB keyboard.
Step 1. While an OUYA upgrade can be done without ADB, for safety and piece of mind I will be installing and using it. If you're at all familiar with Android then you already know about ADB, and probably already have it on your system, if not Snoop05 has a great article with download links and videos, demonstrating how to get ADB working on a windows machine, you can find it here.
Step 2. The next step has been best documented here, by foil. Follow these instructions to make sure you have ROOT, SUPERUSER, BUSYBOX, and CWM RECOVERY.
Step 3. This article by milaq gives us links to all the necessary files we're going to need to finally get CM11 onto the OUYA. Download all the files and place them in your ADB directory (if you did step 1, then it will be c:\adb).
Step 4. Rename ouyabootmenu-mlq-v2.0.4.zip to ouyaboot.zip
Step 5. Rename recovery-clockwork-6.0.4.8-ouya.zip to recovery.zip
Step 6. Rename cm-11-20151130-UNOFFICIAL-ouya.zip to ouya.zip (if you get a newer version the name will be different)
Step 7. Rename gapps-kk-20140105.zip to gapps.zip
Step 8. Rename ouya-keylayouts.zip to keylayouts.zip
Step 9. Open a command prompt, and using dos commands to navigate to your adb directory. (type cd.. until you get to c:\ then type cd adb)
Step 9. Open a command prompt, and using dos commands to navigate to your adb directory. (type cd.. until you get to c:\ then type cd adb)
Step 9a. Type adb push ouyaboot.zip /sdcard/ouyaboot.zip
Step 9b. Type adb push recovery.zip /sdcard/recovery.zip
Step 9c. Type adb push ouya.zip /sdcard/ouya.zip
Step 9d. Type adb push gapps.zip /sdcard/gapps.zip
Step 9e. Type adb push keylayouts.zip /sdcard/keylayouts.zip
Step 9f. Type adb reboot recovery (your OUYA will reboot into recovery)
** The next steps will need to be performed using the USB keyboard attached to your OUYA.
(You should see a screen similar to this.) **
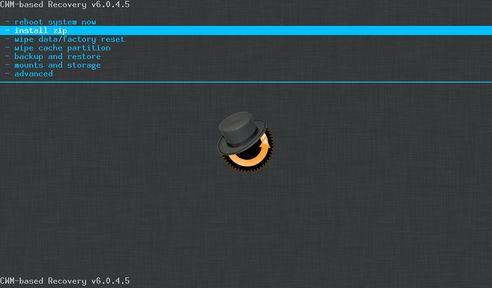
Step 10a. Select -install.zip, then select -choose zip from /sdcard, then select ouyaboot.zip
Step 10b. Select -install.zip, then select -choose zip from /sdcard, then select recovery.zip
Step 10c. Select -install.zip, then select -choose zip from /sdcard, then select ouya.zip
Step 10d. Select -install.zip, then select -choose zip from /sdcard, then select gapps.zip
Step 10e. Select -install.zip, then select -install zip from sideload
From your computer
Step 11. type adb sideload keylayouts.zip
Step 12. type adb reboot
If everything went smoothly you should now have a new boot menu when your OUYA boots.


After a few seconds you will see the following...

If you run into problems you can get into recovery mode using the power button on the OUYA.
If you need any help you can send me an email.
No comments:
Post a Comment
Note: Only a member of this blog may post a comment.